We are often required to position shapes relative to each other - maybe circles mark points on a line - but then you move one of the shapes and update the others position but it doesn't make sense. The answer is relativity!
TLDR #1: Line point editing solution with a group - demo here.
TLDR #2: Line point editing using absolute position and reverse transforms as an explanation for keeping separate shapes positioned together regardless of transformations (position / scale / rotation) is here.
The First Rule of Konva relativity
No - not the Einstein type of relativity. The parent-child type. The Konva model uses a hierarchical container principle whereby each Node is contained within another. When I say Node I mean any of the Konva objects we generally work with.
Lets unpack that.
- The stage is contained within the HTML5 canvas
- The next level down the hierarchy is the layers - these are contained within the stage. So, the parent of Layers is Stage.
- After that we have Konva Groups and Konva Shapes. Groups can contain Shapes but also more Groups. So the parent of Group is Layer or Group, and the parent of Shape is Layer or Group.
Here's a picture to illustrate the concept.
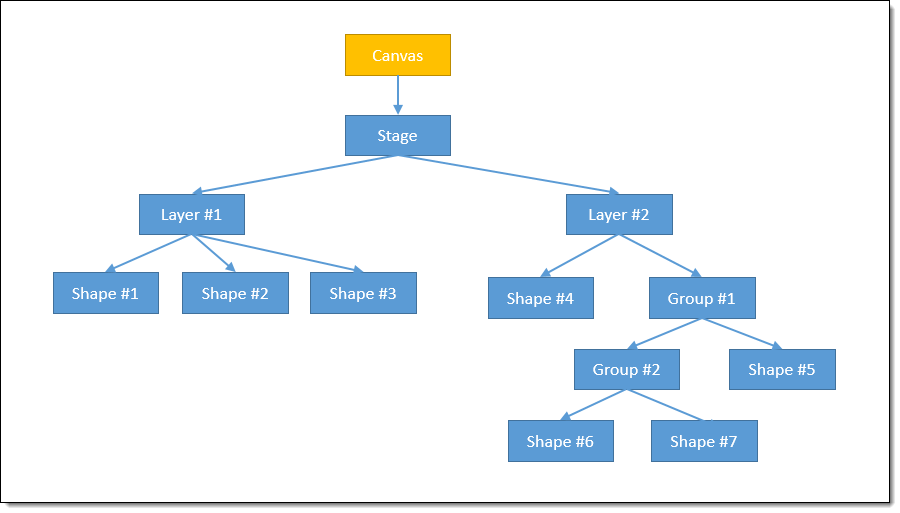
Now we know about the hierarchy we need to know the First Rule - the transform acting on a Node is the sum of all the transforms of its ancestors.
In vector graphics, a transform is something that we use to move, rotate, scale or skew a shape. In Konva we generally use transforms under the hood when we set a shapes position, rotation and scale attributes.
See this Youtube video by Steve Seitz for a great explanation.
Let's keep it simple and think about a node's position only. We'll catch up with more complex transforms later.
Node position
Following the First Rule, the position of a shape on the canvas is the sum of the positions of all of its ancestors.
Example - with the Stage in the default {x: 0, y: 0} position, if you have a Rect at position (10,20) on a layer with position {x: 5, y: 10} and , then the visual position of the Rect is the sum of the parent Layer position AND the Rect's own position, giving {x: 15, y: 30}.
Keep in mind that we could have a Rect in a Group on a Layer in the Stage - that would give 4 possible position components. Also a Group can be a child of a Group, so deeper hierarchies are possible but the rule remains the same whatever the depth.
Line & Path (and Custom Shape) are special cases
So lets talk about these shapes which are a little different to the standard geometric shapes of Rect and Circle because along with the usual Node.position() value which places the shape somewhere on its parent container, they each have further attributes that we have to set to get the desired outcome.
- the Line requires us to give a set of points in Line.points() attribute,
- in the Path it is a more complex set of move-to, draw-to, arc-to, etc instructions in the Path.data() attribute,
- and for the Custom Shape we have to provide our own Shape.sceneFunc(), which is a JS function that receives the canvas context as its only argument and must use raw canvas API functions to do its drawing. If the sceneFunc does any path construction, it will also specify (x, y) co-ordinates.
So far we learned that objectively, the Line, Path and Custom Shape rely on secondary attributes requiring (x ,y) values to specify their output.
The thing to know is that these (x, y) co-ordinates are relative to the position of the Shape itself. So the x & y values in the Line.points() value are relative to the Line.position(). Same for Path and Custom Shape.
The First Rule of relativity in the hierarchy still prevails, so you can think of the Line, Path and Custom Shape following on as a level of hierarchy as far as the co-ordinates used in the deeper points(), data() and sceneFunc() are concerned.
By the way, the Konva.Line is used to construct polygons, so everything mentioned later regarding editing Line.posints() would be the same for editing the vertices of a polygon.
Point editing & saving - a typical bear trap
The trap that gets most people, including me, relates to editing or saving points in a Konva.Line.
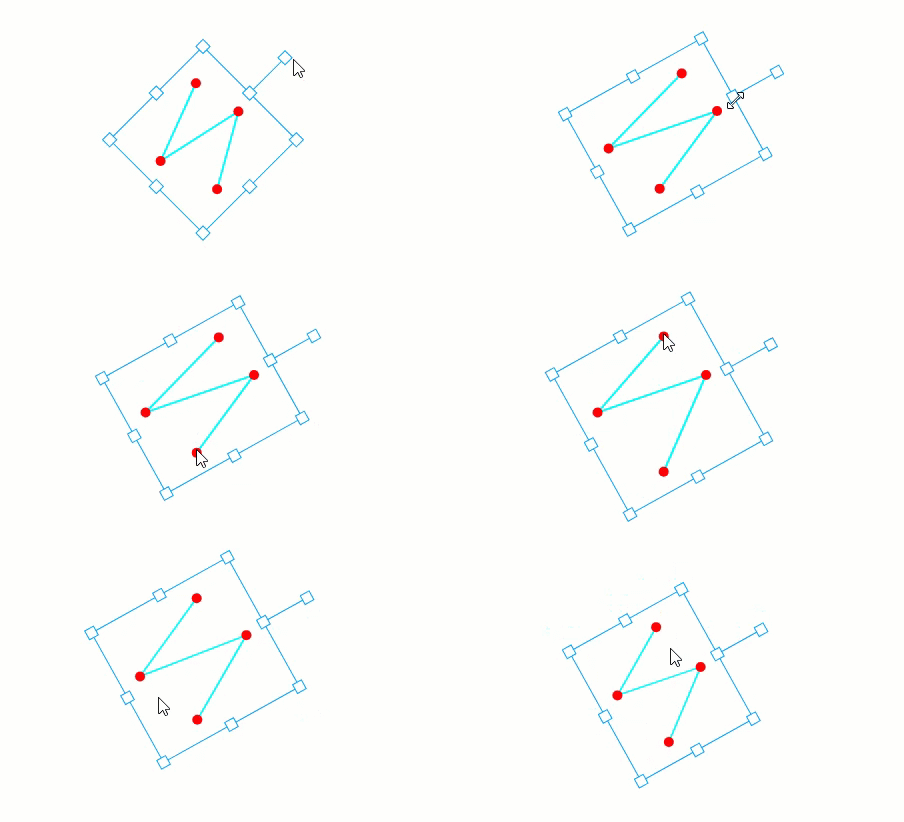
Before we get into this I need to tell you that I would not tackle it this way. The following is used to discuss how to position shapes in different parts of the hierarchy sympathetically when transforms are being used. However, if you are seeking a solution for line editing, the shortcut would be to have the line and circles as children of the same Group. That way, following the First Rule, any transformation of the parent Group would affect all the children in the same way, meaning no extra work for us to achieve the coupling of circles and line points. But using a Group can introduce other challenges so it's a trade off.
The use-case is normally that a multi-point Konva.Line is drawn with a Konva.Circle placed over each point in the Line.points() list. The user can then drag one of these circles and the line should be changed to follow the modification of the point.
See example below.
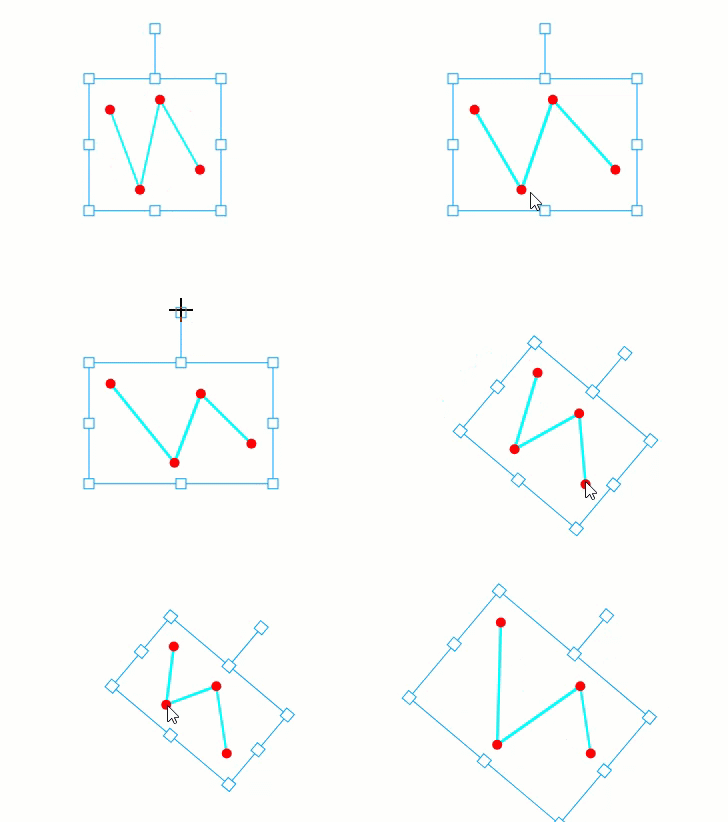
From the Konva hierarchy perspective, we have the stage and layer, and then a Konva.Line with Konva.Circles drawn for each point on the line.
The code to set this up would look like this:
const containerEle = document.getElementById('container'),
  scale = 1,
  stage = new Konva.Stage({
    container: 'container',
    x: 10,
    y: 12,
    width: window.innerWidth,
    height: window.innerHeight,
    scale: { x: scale, y: scale },
    draggable: false
  }),

  layer = new Konva.Layer({
    x: 14,
    y: 16,
   draggable: false
  }),

  line = new Konva.Line({
    x: 180, y: 40,
    strokeWidth: 2,
    stroke: 'cyan',
    points: [10, 20, 40, 100, 60, 10, 100, 80],
    hitStrokeWidth: 10, // makes mouse selection of line easier
    draggable: true,
    rotation: 45
  }),

  circle = new Konva.Circle({
    x: 0,
    y: 0,
    fill: 'red',
    radius: 5,
    draggable: true
  }),

  transformer = new Konva.Transformer({
    padding: 20, // add some padding around the transforming shape
    shouldOverdrawWholeArea: true // drag on empty space
  });


stage.add(layer)
layer.add(line, transformer)

transformer.nodes([line])

// add circles - we position them later
const circles = []
for (let i = 0; i < line.points().length; i = i + 2){
  const point = {x: line.points()[i], y: line.points()[i + 1]}
  const c = circle.clone()
  layer.add(c)
  circles.push(c)
}
A competent developer can normally hack it this far but there is already a potential fatal mistake to point out that will bite later when the line, layer or stage is dragged or otherwise has a change of position.
This mistake is overlooking the First Rule of relativity and specifically that the co-ordinates for the Line.points() are relative to the line.position(). Forget this and as soon as the line is moved away from position (0, 0) the editing circles start to miss their point positions. This mistake would also underline the lack of understanding about parent and absolute coordinates, explained below.
To achieve this ability to position the circles as control points over the line and to change the line to follow any changes to the circles, there are two activities we need to handle.
- positioning circles to match and drag, rotate or scaling of the line
- modifying the line points for follow any edits mad eto the position of the circle control points.
Lets have at it...
Updating the circle positions when the line is transformed
Written as a classic JS function, the code for the positioning the circles looks as below, assuming the only transformation that can happen is changing the position of the line.
Note the use of i and i+1 to refer to the pairs of points in the Line.points() array.
// This function does the work of positioning the circles on the line points
function positionCircles() {

  for (let i = 0; i < line.points().length; i = i + 2){

    const point = {x: line.points()[i], y: line.points()[i + 1]}

    // note - using the line.position + point position !
    circles[i/2].position({
      x: line.x() + point.x,
      y: line.y() + point.y
    })

  }
}
If we call this function any time the line is dragged then it will place the circles over the points, as we require. However, it won't do the same if we rotate or scale using the transformer. Example of this failure below, code to invoke the update follows.
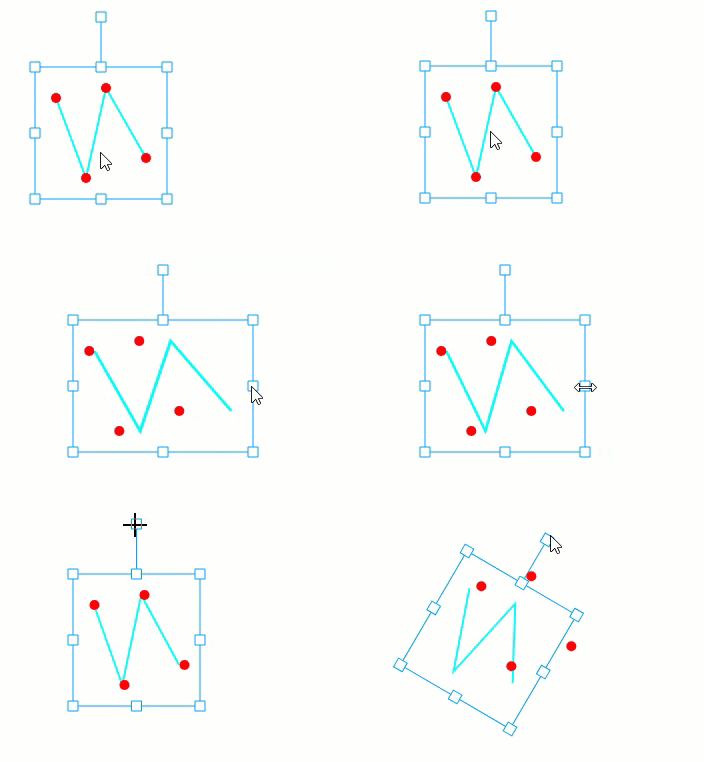
// transformer events listener
transformer.on('dragmove transform', function(){

  positionCircles()

})
But wait, you say, the circles are placed onto the points, so how come they miss when we scale or rotate the line? Good question, and the answer goes to the foundational concepts of 2D vector graphics, or in other words that transform thing I mentioned early in this article.
The principle we need to acknowledge is that the transform affects the attributes of the container it is linked to, but not the contents. For example, say you have a Group with a Circle as its only child. Now add the group to a transformer and drag the right-middle handle. This is what you would see:
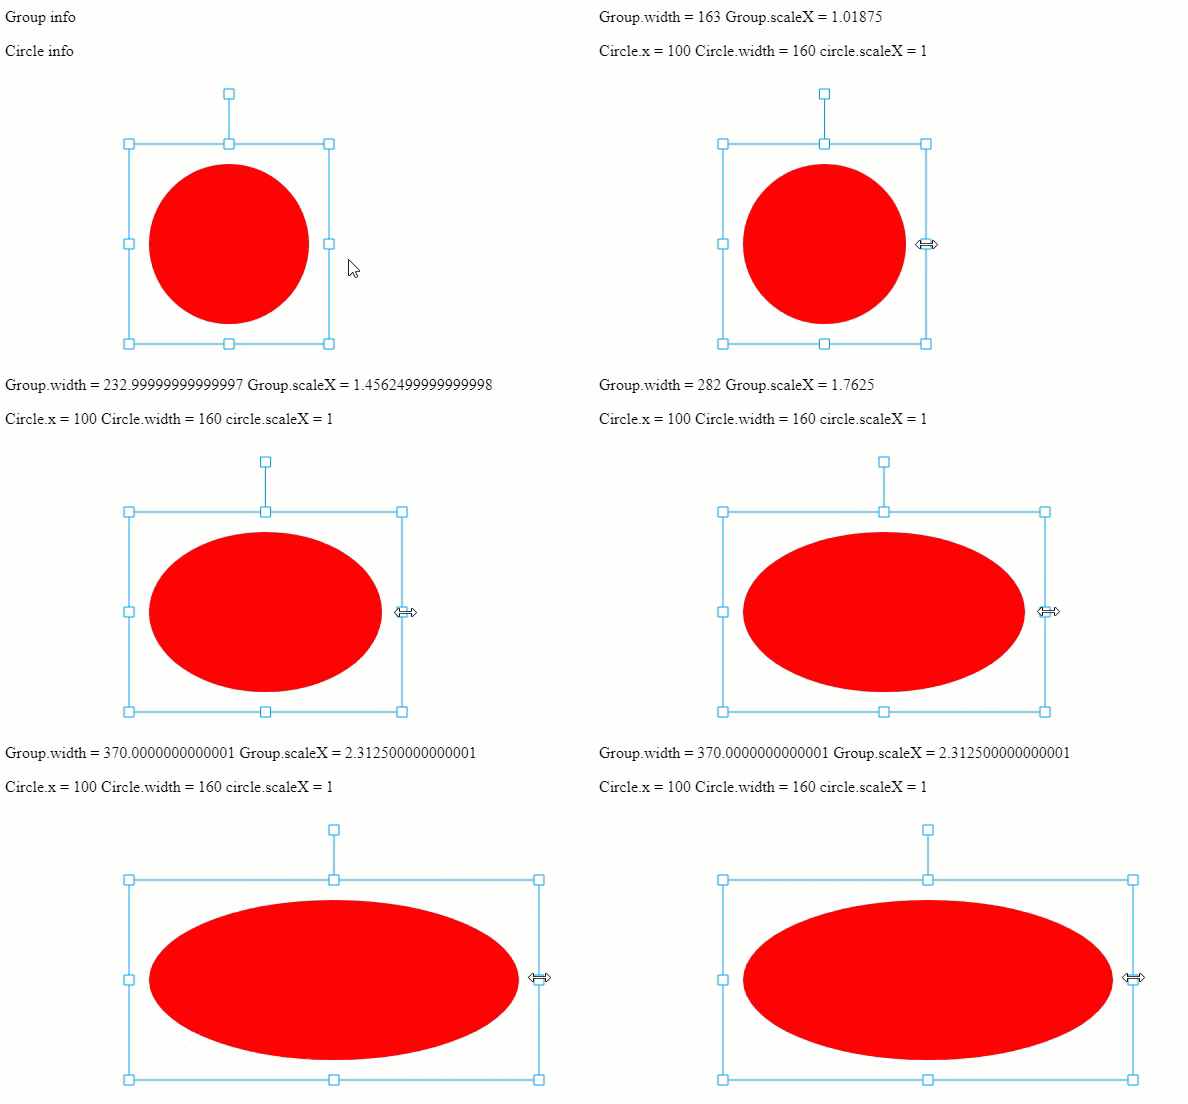
As you transform the Group, none of the attributes of the circle change.
Sure, the group is changing - in fact the group.scaleX is increasing, and you can see the circle visibly getting wider, but if you look at the displayed circle information you can see the circles width and scaleX attributes are unchanged. This is very powerful magic - it allows us to ignore a lot of detail that would otherwise be complex and difficult to get right when we are working with complex combinations of shapes.
Taking this lesson back to our line and its points, we can now intuit that when the transformer acts on the line, the points array remains unchanged. In other words, a line point at (20, 30) is always at (20, 30) no matter how far we stretch or how much we rotate the line.
Now going back to the mission which is to position the circle over the line points, we can see why relying simply on the point co-ordinates is failing - they simply do not change.
Going absolute
The answer lies in using absolute position information. To differentiate the two, all shapes have their shape.position() attribute, and there is also the less used shape.absolutePosition(). The difference is that position() gets the position relative to the parent's position(), and the absolutePosition() gets the position relative to the (0,0) position of the stage. As we have discovered, position() is unaffected by the transforms of a nodes hierarchy ancestors, but I can tell you that absolutePosition() definitely is!
By setting the circle.absolutePosition() we can place the control circles directly onto the line points. The one thing we are missing is how to get those points. We know that the point co-ordinates do not change when the parent Line is transformed by rotation or scaling, and though we can use absolutePosition() on the line we can't use it on the simple array of line points. So how can we work out where those points are?
The answer lies in borrowing the line transform.
Consider that every node - that's stage, layer, group and shape - has a transform. If we don't scale, rotate or change the position of a shape then it stays in its quiet default form. But if we change any of those attributes then it is modified accordingly. It represents a set of math to be applied to the node to get it to appear where we see it on the canvas, and it's applied every time the canvas is redrawn.
And we can use it to our own advantage.
This is perhaps easier to imagine taking the example of an image - if we initially draw the image without any transformation at (0,0) then we can see all of the parts of that image are in place and the image looks like it should. Now change the image's position and rotation - it moves elsewhere on the stage and is rotated, but all of the parts of the image moved so that the image is still unchanged. Conclusion - the transformation applies to every part of the image. And we can intuit that the same would apply to our line - every point on the line moves sensibly under the influence of the transformation.
Therefore, we can apply the line.transform() to any point on the shape to find where that point ends up when the line is transformed.
Here's the transform-capable point update function.
// This function does the work of positioning the circles on the line points
function positionCircles() {

  for (let i = 0; i < line.points().length; i = i + 2){

    const point = {x: line.points()[i], y: line.points()[i + 1]}

    const newPoint = line.getAbsoluteTransform().point(point);

    // note - because we use getAbsoluteTransform we use absolutePosition
    circles[i/2].absolutePosition({
      x: newPoint.x,
      y: newPoint.y
    })

  }
}
A couple of important points
- We need the line.absoluteTransform() to ensure we are following the First Rule and respecting the transforms of all of the ancestors of the line.
- We set the circle.absolutePosition() value to take get it to where we need it to be, respecting all of it's ancestors which may differ from those of the line.
What about dragging the circles / control points?
Glad you asked! The Konva.Circle doesn't have a further level of attribute that affects its visual position (meaning it has nothing like the line.points()). So, in a case where there is no chance of scale or rotation, we just need to subtract the Line.position() from the circle position to get the co-ords of the point. Here's some sample code.
// inside the circle.on('drag', ...) function
line.points([]) // clear the points
for (const circle of circles){
  points.push(
    line.x() - circle.x(),
    line.y() - circle.y()
    )
}
What about rotation, scale, etc ?
What we really mean here is how do we get the position of the circle into some usable co-ordinate for the line point when the line would be moved, rotated, scaled. Sure, we've got a simple circle.position() value, but how do we relate that to the transformed line?
Here's the code:
 line.points([])  // clear current list of line points

    for (const circle of circles){

      // get the position taking account of all ancestor transforms
      const point = circle.getAbsolutePosition()

      // important - must make use copy() to make a copy the transform
      // or else current transform is inverted and it all goes wrong!!
      const newPoint =line.getAbsoluteTransform().copy().invert().point(point)
      line.points().push(
         newPoint.x,
         newPoint.y
      )

    }

    // update the transformer to follow the change of shape
    transformer.forceUpdate()
Not unexpectedly, we start by getting the circle.absolutePosition(). We then run this through the inverted transform from the line. Important - note the use of copy() which if missed will cause the line.transform itself to be inverted. I had a lot of fun finding that out!
So what this says is, take this point on the stage and revert it by the line's transformation to yield an (x,y) position that is relative to the stages (0, 0) position. Since the line itself originates from the stage (0, 0) position, we can use that point as the point for the line.
Job done - we now have a transformation-proof solution to both moving, rotating or scaling the line AND editing the line points via control-point like circles.
Summary
Firstly thanks for reading this far. I tried to edit this down but kept feeling that it was losing what might be that Eureka point for some readers, so it's wordy but well-intentioned.
We've learned about the First Rule of relativity in Konva terms, and how it affects a the hierarchy of shapes that quickly builds up in any Konva solution. We've seen how to use absolute position and reversed transforms to place separate shapes harmoniously.
And we've got takeaway code samples for line editing with a group-based solution and the full abs position and transform version.
Thanks for reading.
VW Sep 2024