Editing line points or vertices of a polygon is a recurring question I see in the Konva Discord. It gets tricky when the line or its parents are affected by transforms. Here's how to make a bulletproof solution that handles that.
TLDR: Here's the sample code to edit and export line points.
Just to clarify re polygons, the Konva.Line has the points() attribute via which we can set a flat array list of & y positions that we want the line to be drawn between. If we set the closed() attribute then the first and last point in the line get connected to give a polygon. I will refer to line throughout this article but everything mentioned here applies to a polygon too.
The mission
We need to achieve three tasks
- Place circles onto the line points - the red dots in the screengrab below
- Set the line points to the position of the circles to allow point editing
- Save the line points
This is what task #1 and #2 looks like. The red dots are circles used to make the blue line points editable. Using the transformer we can rotate, drag and scale the line and the dots stay in sync. We can drag the dots and the line points also stay in sync. The ultimate editable line.
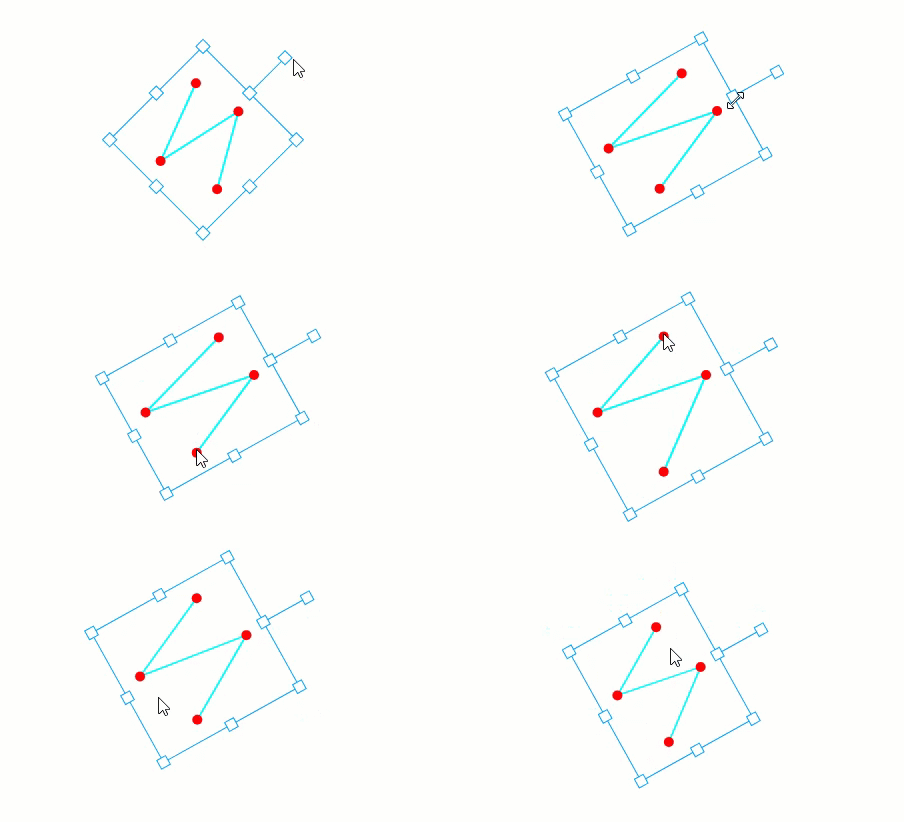
Before we get into this I need to tell you that there is an alternative solution which would be to have the line and circles as children of the same Group. That way, following the First Rule, any transformation of the parent Group would affect all the children in the same way, meaning no extra work for us to achieve the coupling of circles and line points. You would still need the transformations learnings below to get the line points for export but if you are just serialising the stage contents you can get by without that.
Knowledge needed for the solution
Before we get down to solving the tasks, here's some stuff we need to know.
Points are drawn relative to the line position
The Konva.Line follows the rectangle style of shape, meaning it has a position() attribute that sets its top-left location in its parent container. The points in the line.points() list are relative to this position. So, a line point at (10,20) is 10 px right and 20px down from the line.position().
If in your case the line will never be scaled or rotated, then you can stop reading now as the way to get those points should be obvious. But if your app allows the user to employ a transformer on the line then it gets more tricky.
The effects of transformation
I wrote another blog post all about relativity in Konva. The gist is that each shape on a Konva stage is drawn inside a container. Stage is drawn in the HTML5 canvas, Layer is drawn in the stage, Group and Shape can be drawn in a layer or another Group. So we always have a hierarchy in play, and in even the simplest case of drawing a line we always have Stage and Layer ancestors. And any of the ancestors can be transformed.
In vector graphics, a transform is something that we use to move, rotate, scale or skew a shape. In Konva we generally use transforms under the hood when we set a shapes position, rotation and scale attributes.
See this Youtube video by Steve Seitz for a great explanation.
But the key point to know is that a transformation only affects the properties of the container - not the child shapes within the container. In the relativity article I show the case of a Konva.Circle in a Konva.Group where the group is wrapped in a transformer. I stretch the group and though we see the circle get wider, the logged attributes of circle width and scale do not change. Proof that the child shape's attributes are unaffected by the parent container's transformations.
For our task of working with the points in the line we can think of them as children of the line. We can transform the line, but the points remain unchanged.
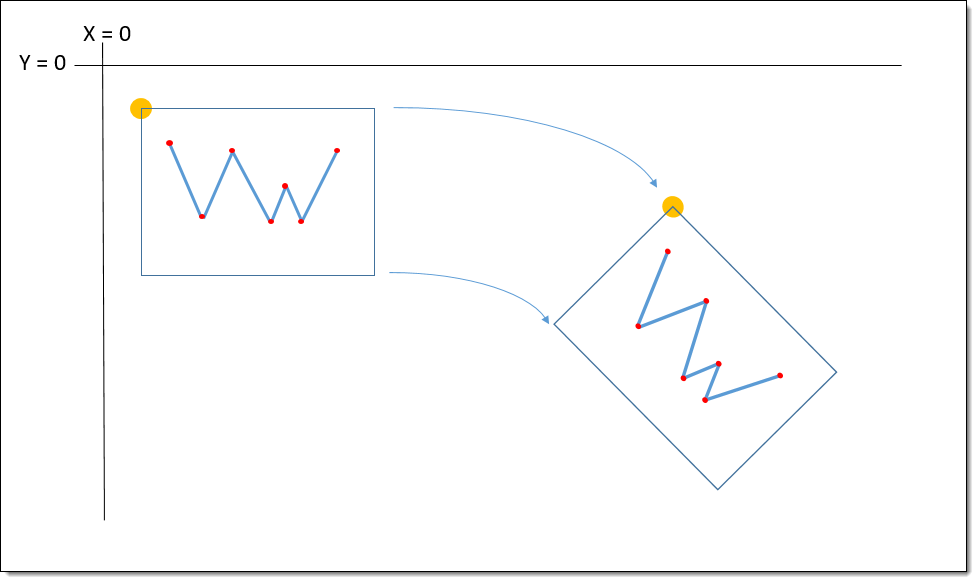
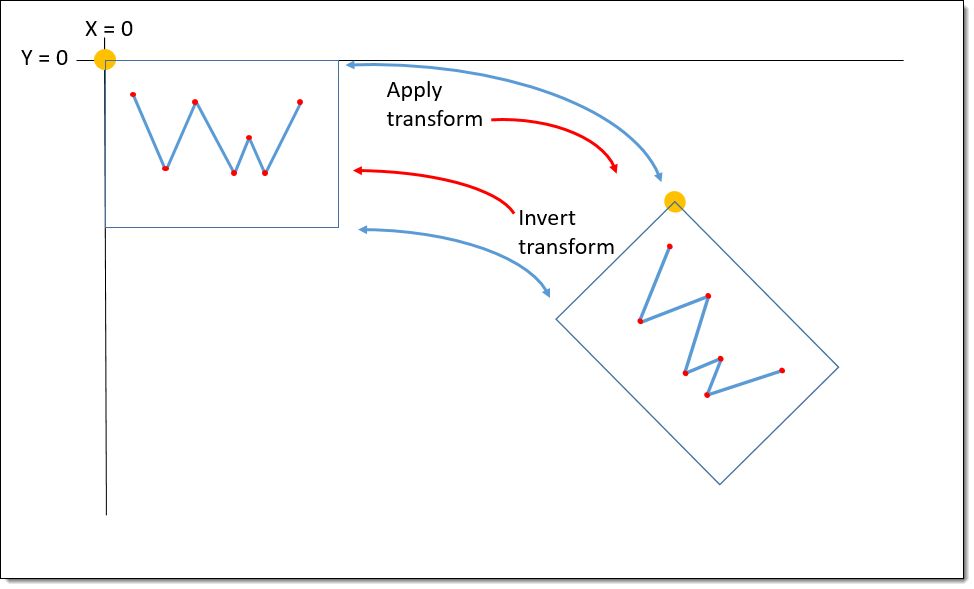
Here is a sketch of a Konva.Line being transformed by changing its position and rotation. The line shape is drawn with a box around it to remind us that it is rectangle-based and make comprehension easier, with its top-left position marked by the orange circle.
Getting on with the tasks
How to achieve those tasks? We could probably hack together some math to cover some of the transforms, but remember the line shapes ancestors could have transforms applied meaning that math could get hard quickly.
Ideally we need to be able to switch fluidly between the transformed positions of the points and some untransformed state where we have certainty about the points relationship to other shapes. I wonder how...
Every shape has a transform
The key tactic to switching between simple and transformed points is to understand how transforms work. If you didn't watch the short video I linked above, do it now. As far as the application of transformation matrices in Konva goes, I think of it like this:
Every shape has a dedicated transformation matrix (aka transform) that belongs to that shape like any other attribute. Before we change the transform, all shapes are drawn at their parent container's origin, with no rotation and at scale = 1. Whenever we change the shapes attributes for position(), rotation() or scale(), under the hood we modify the transform. Whenever the canvas is redrawn, Konva uses each shapes transform to show the shape where the attributes indicate it should appear on the canvas.
This is what that looks like.
When the shape transform is applied the shape position is changed and rotation is applied. We can also invert the transform to go the other way. Konva's Transform class is what we use to make this happen.
Task #1 - Place circles onto the line points
To achieve this we need to borrow the line's transform and apply it to each of the line points to get the location for the circles.
Transform borrowing
We can get the transform for a shape via shape.getTransform(). Having got that, the class lets us apply the transformation to any point via the transform.point() method. Therefore, if we know an untransformed point on the canvas, we can take it through the same change of position, rotation and scaling as was applied in the transform.
Now we combine two pieces of knowledge:
- we know that the points in a Line are drawn relative to its top-left, treated as the (0, 0) position
- We know that the transform operates on the shape which is initially drawn at the (0, 0) position.
Therefore, before shape transformation, the line points are drawn relative to the canvas line containers origin. Which means that we can apply the transform to each of the line points to get its transformed position which is where we need to place the circles. Note that this works whatever position + rotation + scale that has been applied to the line.
Going absolute
One small bear trap here is relativity - you did read my other post on relative positions? Don't worry, the gist is that as far as the Konva shape hierarchy (stage > layer > shape etc) the transforms are additive, which means that line might be affected by, for example, the scale of an ancestor Group or Layer.
To overcome this, Konva gives us the shape.getAbsoluteTransform() method. This is the one we need to place those circles accurately, and with this in place the solution is bullet proofed for whatever transforms are applied higher up the hierarchy.
So grabbing the transform from the line will get us the absolute position of the points of the line. When we apply that to the circles we need to set the circle.absolutePosition() value and we are all good. Setting absolutePosition() accounts for all the potential ancestor transforms that might otherwise affect the plain circle.position().
This is what that looks like, assuming we have an array of circle shapes set up to use as the line point markers, as in the demo code:
// This function does the work of positioning the circles on the line points
function positionCircles() {

  for (let i = 0; i < line.points().length; i = i + 2){

    const point = {x: line.points()[i], y: line.points()[i + 1]}

    const newPoint = line.getAbsoluteTransform().point(point);

    // note - because we use getAbsoluteTransform we use absolutePosition
    circles[i/2].absolutePosition({
      x: newPoint.x,
      y: newPoint.y
    })

  }
}

// transformer events listener
transformer.on('dragmove transform', function(e){

  positionCircles()

})
This completes task #1 - putting the circles on the line points.
Task #2 - Set the line points to the position of the circles
This task requires that when a circle is moved, the line point it sits over is changed, which effectively gives us line point editing.
The solution to this task also requires us to borrow a transform, but in this case it is the inverted transform that we need.
The inverted transform takes any point and applies the reverse of the shape's transform to it. Because, conceptually, the circle is marking a point on the line, we can give the absolute position of the circle to the inverted line transform and that will produce the untransformed circle position - as if the line was positioned at (0,0).
We know that the line points are drawn relative to the lines position point. Therefore this untransformed circle position gives us the new point location.
This is what that looks like in code:
// Delegate the circle drag listener to the stage - useful technique
stage.on('dragmove', function(e){


  if (e.target.getClassName() === 'Circle'){

    line.points([])  // clear current list of line points

    for (const circle of circles){

      // get the position taking account of all ancestor transforms
      const point = circle.getAbsolutePosition()

      // important - must make use copy() to make a copy of the transform
      // or else current transform is inverted and it all goes wrong!!
      const newPoint = line.getAbsoluteTransform().copy().invert().point(point)
      line.points().push(
         newPoint.x,
         newPoint.y
      )

    }

    // update the transformer to follow the change of shape
    transformer.forceUpdate()

  }
})
Important: note the line that uses line.getAbsoluteTransform().copy().invert(). It is critical to use copy() otherwise the line.transform will be inverted and we want to avoid this!
This completes task #2 - setting the line points to the position of the circles
Task #3 - Saving line points
There are some options about the motivation for this - for example are we passing the raw points on the canvas to some third party process, or are we saving them to restore into Konva later. Here I will show how to get the raw point co-ordinates.
Getting the points on the canvas is simply a repeat of task #1. The mental picture is that we place the line shape at position (0, 0) then apply the line shape's absolute transform on each of the points in the line.points() list. The result is the raw canvas position of the point as we see it.
This is what the code would look like:
// This function gets the absolute position of the line points
function exportPoints() {

  const exportPts = []
  for (let i = 0; i < line.points().length; i = i + 2){

    const point = {x: line.points()[i], y: line.points()[i + 1]}

    exportPts.push(line.getAbsoluteTransform().point(point));

  }

  console.log(exportPts)
}
Bonus task - draw the line resetting the transformation
I have seen a question asking how to reconfigure the Konva.Line so that it is drawn at the same position but with scale and rotation reset. We can do this easily with the absolute line points that are be retrieved from task #1.
Here is the code for that:
// function to retain visible line position but reset other shape transform parts
function drawLineUntransformed(){

  // get the absolute position points.
  const absPoints = exportPoints()

  // clear current points
  line.points([])

  // clear the current transform - resets position, rotation, scale & skew
  line._clearTransform()

  line.absolutePosition(absPoints[0])

  for (let i = 0; i < absPoints.length; i++){

    // x point = point.x - line.x
    line.points().push(absPoints[i].x - absPoints[0].x)

    // y point = point.y - line.y
    line.points().push(absPoints[i].y - absPoints[0].y)

  }

  // reposition the circles
  positionCircles()

  // update the transformer to follow the change of shape
  transformer.forceUpdate()
}
Summary
We've seen how to edit line points, even when the line is transformed by position, scale and rotation. To do that we learned about borrowing transformations and how to invert them. And we've got takeaway code to adapt and use right now.
Thanks for reading.
VW Sep 2024