
I am writing a component - it's the keyboard and mouse handler for a canvas-focussed rich text editor control. I've got to test behaviour with the component created and loaded with text, then with a number of sequential user actions applied. And I have to run multiple tests. Finally I need to generate a decent-looking test run report. I had to go DIY, so what did I do?
My dev setup for Konva uses TypeScript. I use Vite to make life simple in the edit-compile-view loop, and to simplify bundling.
Anyhow, Vite works well for development, but then we come to testing...
I have two challenges with testing this component:
- Testing konva is challenging because it is all about the picture you see on the canvas. To overcome this we have to trust Konva to draw what we ask it to draw, then we only have to focus our testing on how we compute what Konva should show. In other words we test our model.
- To test my component usefully I have to instantiate it, load some text, then simulate user clicks and arrow keys, then test various things like where the caret is at, what the highlighted selection is, etc. Why I bothered writing that was to illustrate that I'm not testing a sum function which is the to-do list demo you see in the Jest amd Vite-test docs. My case is a tad more involved!
Since I use Vite, Vitest should be the go-to solution for testing. However, I found Vitest to be flaky with the combination of node-canvas (a lib) and Vitest threads (a feature of Vitest). The Canvas plugin is critical to testing anything to do with canvas - i.e. Konva, and the threads feature makes testing run faster by going parallel.
The observed effect was a crashing of node.js and an intermittent fail of the tests to run - about 50% of the time. Console logging to stdout from within the tests appeared to indicate that they were being run, but the output in terms of pass or fail was inconsistent to a point of non-usability.
There are unresolved issues related to Vitest and node-canvas logged with Vitest.
After hours spent researching I ultimately decided to bin Vitest for now and move on to a DIY solution. I would gladly revisit Vitest if the team could solve this issue as I would prefer not to have to DIY.
Requirements
My requirements are to be able to define a set of tests, run them repeatedly, and accumulate the results.
Recall that I am developing a component, each test will require that the component is set up before the test can be run, so let me give you a sketch of what my component does to help you understand what follows.
My component is part of a canvas-based rich text editor - specifically the component that will handle keyboard and mouse / touch input. Think about your favourite text editor, and what happens when you click a character somewhere in your code, right-arrow along a few characters, then shift-click a character elsewhere in the document?
The shift-click causes a selection to be made from the first clicked character position to the one that was shift-clicked. Something like this GIF shows.

My testing is concerned with what happens when the mouse click occurs - does the component sense the expected character was clicked? Then does the caret appear in the correct location? And after the shift-click, what are the start and end characters of the selection?
In classic testing we would test something small and simple - for example if we had a method that was intended to sum numbers we would pass it some numbers and test for the expected result.
But for my component I am looking more at testing the outcome of a more complex processes. And to run my tests I need a specific context, meaning the rich text component is loaded with a specific paragraph of text using specific font and size. Setting up that context is an unavoidable overhead, but I can run multiple tests against the context.
This implies that the logic for testing is something like this:
For each test file in the test folder
  Set up the context defined in the file
  For each step in the test file
    Apply the action
    For each test in the step
      Run the test
    End for
  End for
End for
There will be many tests. I do not want to have to code them individually. Instead I want data-driven tests. I am happy to set up some kind of meta information in JSON form, so I will need some kind of test runner to load and execute these tests.
Inside the JSON files will follow a format as per the test1.test.json example below.
{
  "setupModule": "setup1",
  "steps": [
    {
      "name": "Testing mouse click response",
      "actions": [
        {
          "name": "mouseClick",
          "position": {
            "x": 105,
            "y": 53
          },
          "shiftKey": false
        }
      ],
      "tests": [
        {
          "name": "Cursor position",
          "source": "cursorInfo",
          "type": "charCompare",
          "value": {
            "id": "chr8",
            "text": "a"
          }
        }
      ]
    },
    {
        "name": "Testing shift + mouse click selection response",
      "actions": [
        {
          "name": "mouseClick",
          "position": {
            "x": 212,
            "y": 56
          },
          "shiftKey": true
        }
      ],
      "tests": [
        {
          "name": "Selection range",
          "source": "cursorInfo",
          "type": "selectionCompare",
          "value": {
             "fromChar": {"id": "chr8", "text": "a"},
             "toChar": {"id": "_chr18", "text": "e"}
          }
        }
      ]
    }
  ]
}
This test file asks for a setup module to be loaded and executed - more about that later but just take it as given that this sets up my component context.
Next we have 2 steps. A step consists of optional actions, and mandatory tests - at least one. The concept is that the actions change the state of the internal model within the component via interacting with the component's API. Looking at the first step we can see the only action is to send a 'mouseClick' at a specific (x, y) position and with the shift key indicator set false, meaning a straightforward mouse click at (x, y).
The step then requires a test to be run - in this case the test is to get the cursor position from the API, and compare the response to the expected value which contains a character id and a letter. If the character at the point of the mouse click is not 'a' or does not have character id 'chr8', then the test fails.
My testRun code will generate an HTML file to display the results - here is an example based on the sample test file. As we can see, each file, step and test have a result indicator - for illustration there was a deliberate error in the test config above. The first test passed but the second failed. This failure bubbles up through the step and to the file level, giving a straightforward indication of where and why the failure occurred.
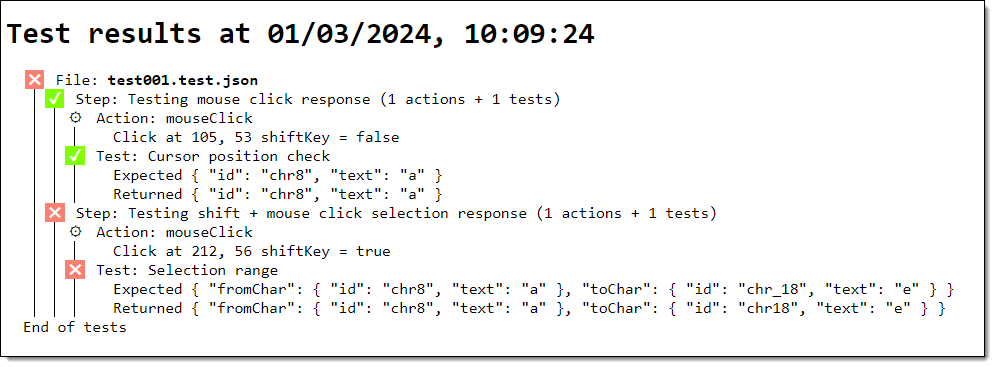
So the process will be
- Make a test context for the component and load whatever overall config the tests require.
- Execute the tests in sequence. Each test will consist of an instruction (action) - like 'click at position (x, y)', which will be encoded into a more easily parseable instruction, and a test to be run.
Each set of tests will have an overall description and each test a further name.
Each test will pass or fail.
And the above HTML page will be created for the results of each test run.
Design
As mentioned above, the code that runs the tests will be written in TS and there will be many tests defined in JSON files. I will need some kind of test runner to load and execute these tests. I'll set up a TS file named vwTestRunner.ts, then call this from node asking vite-node (discussed below) to execute it. Vite-node will transpile the TS for this file and any modules that are imported.
But hang on - I want write this test runner thing with TypeScript. If this was targeted at the browser I could rely on Vite to handle all the transpiling. However, I'm targeting node.js - Vite does not play there. And anyway, I want this to run in another terminal whilst Vite runs in the first. That way Vite will refresh the client view in the browser as I change code and this test process will re-run the tests.
Both at the same time.
Introducing vite-node
Vite-node is the power behind the throne of Vitest. We can invoke a TS file just by using
npx vite-node myfile.tsAnd we get all the power of TS transpilation, plus trans-coding the import statements to require for node, and anything we import is transpiled too.
Importantly, vite-node allows us to use the dynamic import feature of ES6, which will be vital in setting up our context, as we will see.
The Solution
The approach that I will take is to use vite-node as the execution engine of a test runner component. This executes typescript without the need for prior compilation.
The test runner will seek files in a given folder. The file format will be *.test.ts.
The test runner will dynamically load each test JSON as a module.
The test JSON will define the TS file to be used to do the setup of the context for the test.
The test JSON will define the steps, (user) actions, and tests.
Results will be output into an HTML file as per the example above.
Node packages
First ensure you are on latest node.js version. Go to node download page and get the installer.
Then install the following packages:
npm install --save-dev Konva Canvas typescriptKonva is the Konva library - a wrapper for the canvas element that gives an object-based view of the contents. Canvas is require for Konva since node does not provide the HTML5 canvas element that we find in the browser DOM. My component uses Konva.
The test runner
There's a lot of code here but I wanted you to see it all in context. I'll walk you through what's going on after the code box.
// VW test runner
import { promises as fsPromises } from 'fs';
import * as fs from 'fs';
import { HtmlMaker } from './htmlMaker.js'
import {TestHandler} from './TestHandler.js'

class vwTestRunner {

    testHandler: TestHandler;
    testStats: any = {}
    currentFile: any = {}

    constructor(path: string) {

        this.testHandler = new TestHandler()
        this.testStats.files = <any[]>[]

        this.exec(path)
    }


    // Reads all files in a specified directory
    listFiles(dir: string) {
        return new Promise((resolve, reject) => {
            let fileList: any[] = [];

            // Get all files in the directory
            fs.readdirSync(dir).forEach(file => {
                if (fs.statSync(`${dir}/${file}`).isFile()) {
                    fileList.push({ name: `${file}`, fullPath: `${dir}/${file}`, content: fs.readFileSync(`${dir}/${file}`).toString() });
                } else {
                    resolve(this.listFiles(`${dir}/${file}`));
                }
            });

            resolve(fileList);
        });
    };

    async exec(path: string) {

        // await this.doTests(path)
        console.log('Starts')
        await this.handleFiles(await this.listFiles(path), path);
        console.log('Ends')

        const htmlMaker = new HtmlMaker('Test results at ' + new Date().toLocaleString('en-GB', { timeZone: 'Europe/London' }) )

        let fileNo = 0
        for (const file of this.testStats.files) {

            htmlMaker.addInfo(0, "File: <b>" + file.name + '</b>', '', this.getResultClass(file.result))

            for (const step of file.testInfo.steps) {

                const actionCount = typeof step.actions === 'undefined' ? 0 : step.actions.length
                const testCount = typeof step.tests === 'undefined' ? 0 : step.tests.length
                htmlMaker.addInfo(1, 'Step: ' + step.name, `(${actionCount} actions + ${testCount} tests)`, this.getResultClass(step.result))

                for (const action of step.actions) {
                    htmlMaker.addInfo(2, 'Action: ' + action.name, '', 'info')
                    htmlMaker.addInfo(3, action.info, '', 'gap')
                }

                for (const test of step.tests) {
                    htmlMaker.addInfo(2, 'Test: ' + test.name, '', this.getResultClass(test.result))
                    htmlMaker.addInfo(3, 'Expected', test.expected, 'gap')
                    htmlMaker.addInfo(3, 'Returned', test.returned, 'gap')
                }
            }
            htmlMaker.addInfo(0, 'End of tests')
        }

        // At this point we have a JS object that contains all test info and results. Now we make the html doc.
        fsPromises.writeFile(__dirname + '/test_results/results.html', htmlMaker.getOutput())
    }


    async handleFiles(fileNames: any, path: string) {

        const that = this

        for (let fileNameObj of fileNames) {

            const fileName = fileNameObj.name


            if (fileName.toLocaleLowerCase().includes('test.json')) {

                this.currentFile = { name: fileName, result: 0 }

                this.testStats.files.push(this.currentFile)

                const fileContents = fileNameObj.content

                const testInfo = JSON.parse(fileContents)

                this.currentFile.testInfo = testInfo

                try {

                    if (testInfo.setupModule) {

                        const moduleName = path + `\\${testInfo.setupModule}.ts`

                        await import(moduleName).then(function (setupModule) {

                            const context = new setupModule.setup()

                            if (!context.stage) {
                                throw new Error("No stage - setup failed!")
                            }

                            that.processFile(testInfo, context)

                        })

                    }

                }
                catch (err) {
                    console.log('Error is: ', err);
                }


            }

        }
    }

    async processFile(testInfo: any, context: any) {


        testInfo.result = 0

        const that = this
        try {

            // apply the steps of the test
            const results: any[] = []
            for (const step of testInfo.steps) {

                step.result = 0

                this.runActions(context, step)

                that.runTests(context, step, testInfo)
            }

        } catch (err) {
            console.log('Error is: ', err);
            return false
        }
    }


    runActions(context: any, step: any) {

        for (const action of step.actions) {

            switch (action.name) {

                case "mouseClick": {

                    const evt = {
                        evt: {
                            shiftKey: typeof action.shiftKey === 'undefined' ? false : action.shiftKey
                        }
                    }
                    action.info = `Click at ${action.position.x}, ${action.position.y} shiftKey = ${evt.evt.shiftKey}`

                    context.cursorHandler.mouseDownAt(evt, action.position, context.rtxDocument.charList)

                }
            }
        }

    }

    runTests(context: any, step: any, testInfo: any) {

        for (const test of step.tests) {

            test.result = 0
            let result = 0

            switch (test.type) {

                case "charCompare":
                    {

                        const
                            cursorInfo = context.cursorHandler.getInfo(),
                            charInfo = cursorInfo.caretInfo;

                        test.expected = JSON.stringify(test.value, null, '\t')
                        test.returned = JSON.stringify(cursorInfo.caretInfo, null, '\t')

                        result = this.testHandler.run(context, test, [test.value, charInfo])

                    }
                    break;

                case "selectionCompare":
                    {
                        const
                            cursorInfo = context.cursorHandler.getInfo(),
                            selectionInfo = cursorInfo.selectionInfo;

                        test.expected = JSON.stringify(test.value, null, '\t')
                        test.returned = JSON.stringify(selectionInfo, null, '\t')

                        result = this.testHandler.run(context, test, [test.value, selectionInfo])
                    }
                    break;

            }

            // Apply the result to the step, test and file
            test.result = test.result + result
            step.result = step.result + result
            testInfo.result = testInfo.result + result
            this.currentFile.result = this.currentFile.result + result

        }
    }

    // Get the HTML class for the given result
    getResultClass(result: any) {
        let resultClass = ''
        result = result + ''
        if (result.length === 0) {
            resultClass = 'gap'
        }
        else {
            resultClass = (result === '0' ? 'pass' : 'fail')
        }
        return resultClass
    }

}

const r = new vwTestRunner("./src/__tests__")
Our npx command invokes vite-node with the above vwTestRunner.ts file as its target. That hits the constructor where we call the exec() method to get the real work started.
We are dealing with file access operations here so the call to handleFiles() has await, and as the first parameter going into that we also await the file listing operation module listFiles(). This returns an array of file objects including the file path, name and contents - having the contents read streamlines the process of loading the tests compared to having another method to read each file in turn.
When the file list is in, we reach handleFiles(). Here the critical line is where we see "await import ...". This line is dynamically importing the module with the name it found in the config definition for the test. I can't stress enough how useful this is - it allows us to define a setup module that contains the TS code to set up the Konva stage, layers and other shapes, plus the instantiation of my component.
The flexibility for testing that this gives is massive - each test can refer to its own specific context setup, or multiple tests can refer to the same one. How I will use this is to have different passages of text loaded into my rich text component, set differing alignment, font sizes, other styles, etc, such as are needed by my testing requirements.
After that we are on to processFile() and from there to the runActions() and runTests() methods. How these are coded will depend on your use-case for testing. For my case, runActions() is applying an action instruction from the test JSON file to the component via its API. How you go about making this work is up to you - this is not really what this post is about.
And runTests() is similarly up to you and your requirement. The important point here is that each test ultimately returns a 0 value for a pass and a 1 for a fail. To score the pass/fail for the steps, the JSON file and the test run we can then simply add the result value into the result total on each object - any value > 0 is a fail.
After handleFiles() ends and we return to exec() we have a fully formed JS object containing the description and results of all of the test files, their steps, actions and tests. The final act is to output this to an html file.
I made a simple html handling module in vwHtmlMaker.ts, code included below for completeness although this is not the focus of this post.
// vwHtmlMaker
export class HtmlMaker {
_title: string = ''
output = ''
constructor(title: string){
this.title = title
}
set title (val: string){
this._title = val;
}
addInfo(indent: number,info: string, info2: string = '', className: string = '', visClass: string = '' ){
let indentStr = ''
for (let i = 0; i < indent; i++){
indentStr = indentStr + '<span class="level vertical_line lp' + i + '"> </span>'
}
this.output = this.output + `<div class="${visClass}">
 ${indentStr}
<p class="inline_block ${className}">${info}</p>
<p class="inline_block">${info2}</p>
</div>`
}
getOutput () {
return this.makePage(this._title, this.output)
}
makePage (title: string, data: string){
return `<!DOCTYPE html>
<html>
<head>
<title>Test results</title>
<style>
* {
font-family: monospace;
font-size: 1.02em;
}
p {
margin: 0;
}
h1,
.headline {
font-size: 2em;
font-weight: bold;
}
.inline_block {
display: inline-block;
}
.line_nummber {}
.blue {
color: #0087ca;
}
.level {
display: inline-block;
min-width: 1vw;
}
.vertical_line {
border-right: 1px solid black;
}
.pass::before {
color: white;
content: "✔";
margin-left: 2px;
margin-right: 10px;
padding-left: 3px;
padding-right: 3px;
line-height: 0.9;
background-color: Chartreuse;
min-width: 1vw;
}
.fail::before {
color: white;
content: "✖";
margin-left: 2px;
margin-right: 10px;
padding-left: 3px;
padding-right: 3px;
line-height: 0.9;
background-color: salmon;
min-width: 1vw;
}
.info::before {
color: black;
content: "⚙";
margin-left: 2px;
margin-right: 10px;
padding-left: 3px;
padding-right: 3px;
line-height: 0.9;
}
.gap::before {
display: inline-block;
content: " ";
padding-right: 20px;
padding-left: 7px;
}
.hide {
display: none;
}
</style>
</head>
<body>
<p><h1>${title}</h1></p>
<div class="main">
${data}
</div>
</body>
</html>`
}
}We now have a simple and configurable test process that allows for complex test context creation and produces a decent-looking test report. All we need to do now is think about how to make it automatically fun every time we make a change.
Automation
The way to manually execute the test is to open a terminal window and enter
vite-node --script ./src/testrunner/vwTestRunner.tsBut instead of having to manually execute this command, it would be great if node could watch for changes of any file in my test folder and re-run the tests when any change happens. Vite-node documentation and web searches reveal that vite-node does have a --watch option but this appears to either not work at all or not support the way I am using vite-node.
Therefore I have reverted to the trusty nodemon package, installed via
npm install --save-dev nodemonWith that in place we can modify the test script in package.json to read as below.
Here we are using the --exec option of nodemon to run a non-node command - in this case I use npx to kick off vite-node which is running vwTestrunner.ts but watches the entire folder contents around it. Changing a TS file, or more importantly a JSON file, causes nodemon to restart the vite-node process and the job runs.
  "scripts": {
    "dev": "vite",
    "build": "tsc && vite build",
    "preview": "vite preview",
    "test": "nodemon --exec vite-node --script ./src/testrunner/vwTestRunner.ts"
  },
Note that we don't get the benefits of all the capabilities of vite-node such as HMR, but that's not really the focus of this effort - I mainly needed a way to have the test folder watched and the test process re-run when any change occurred. Mission accomplished then!
Roadmap
Further enhancements I plan to make include an expected and actual model dump which will need a deep JSON compare, and pre and post snapshotting of the canvas output - I do trust Konva to output what I ask, but I don't trust myself to always ask correctly, so a snapshot of the output before and after a test will be useful.
Summary
We've explored how to make a DIY test setup for a complex testing scenario which involves creating a context in which to run the tests. We found a way to define the tests in JSON, dynamically load the setup module for a test, handle user action simulation, and run a sequence of tests with home-grown result v's expectation checks.
We found a way to make that all work using TypeScript and Vite-node, and how to output a decent looking test run report.
Thanks for reading.
VW March 2024