
So you need undo-redo for your project. I'm sorry to be the bearer of bad news, but there is no perfect one-size-fits-all solution because the uniqueness of your app means you need some unique parts to its undo-redo solution. But the good news is that you are here and this blog describes an overall approach that you can adapt to meet your needs.
This is a long read but I promise you it's worth the commitment. You'll either learn something new or confirm what you might have discovered for yourself. Get a flask of coffee or other beverage of your choice, put on some focus music and dig in...
TLDR: The code for this article is all here in a single CodePen. Fill your boots, but bear in mind the discussion of the 'why' is as important as looking at the code in this instance.
I'm going to be agnostic about technology in this article since the points I cover are about an approach rather than specifics. I'll be using plain JS and the only slightly advanced part of it is that I use classes in the demo which I think makes it as clear as it can get.
Depending on what framework or lib you use, you might get some built-in assistance with undo-redo and that part of this article might not be so much use, but I cover other things that might be of value.
First some background...
If you are anything like I was, the first time I got a rectangle to show up in the canvas I was amazed. The gratification was instant, so I wrote more of the same kind of code adding a few more buttons to the knocked-up UI for 'Add circle', 'Add star', and 'Add line'.
I now felt like the God of canvas-based UI. Those graphical objects were appearing precisely where I wanted them to, at exactly the size I need, and in the border and fill colors I set. What powers I had.
In the throws of self congratulation I coded on into the night, starting to flesh out the basics of the UI I needed to build for my project.
After a while I had a palette of buttons with onClick code to let the user add the shapes need for the app - I could even let them draw shapes with the mouse and even pan and zoom the canvas view! This canvas stuff was my new super-power.
Then came the crash - how make an undo-redo process.
And so the refactoring began...
There's a certain length of road that has to be travelled so as to be able to understand the concepts of working with Konva - The author
There is nothing wrong with enjoying the feeling of new power that Konva provides and I'm not about to get all opinionated and tell you that what you are doing is wrong. It's just that you should be ready to slow down a little and not venture too far with those simple principles because what you now know are the building blocks, but how to put them together for the best outcome is still ground you need to cover. If you don't you'll come to a point where refactoring your code to add the features explained below will be painful and have a high time cost.
Incidentally, my feeling is that this is where a lot of friction with stake holders can start - you (or more likely your boss) show them some screen grabs of the shapes that you threw onto the canvas that look something like the requirement and everyone assumes that because you made that in a few hours then the rest of the build will be just as simple and they don't understand why development seems to slow down so drastically a short time later.
Sermon over - lets see what I'm banging on about...
You need a model!
Ok - here's the first bump in the road. I wrote another post about why you should use a mode for your canvas app which explains the point, which is that apps are never about about simple rectangles and circles - they are about window frames, or seating plans, or furniture layouts, or posters, or business cards, or games. The rectangles, images, lines, groups and other shapes that Konva provides are then the building blocks of the visualization of those subject-based objects.
In practical terms, the model is what you serialize for save & reloading. The Konva shapes are the UI. Funnily enough, UI stands for 'user interface' - yup, Konva is the users interface to the model!
Conceptually these objects live inside the app 'model' - I'm not going to get all opinionated about MVC, specific frameworks or libs here, I just want to establish that this demo has a model.
You will shortly come to see that what you learned in that euphoric stage when you were gleefully throwing out shapes onto the canvas will now quietly slip to the background as you consider how to represent the app-specific objects on the canvas. I'm not saying that what you learned is unimportant - far from it - but in terms of your app, the Konva parts will become less front-and-center and move into the background of your code as you get into the creation of your app. You might not feel that at the moment but trust me, you will.
Sample app - restaurant layout planner
To give some context, I'll take an example of a restaurant table layout app - under 900 well-spaced lines of JS - via which the user can make a plan for the layout of tables in a space.
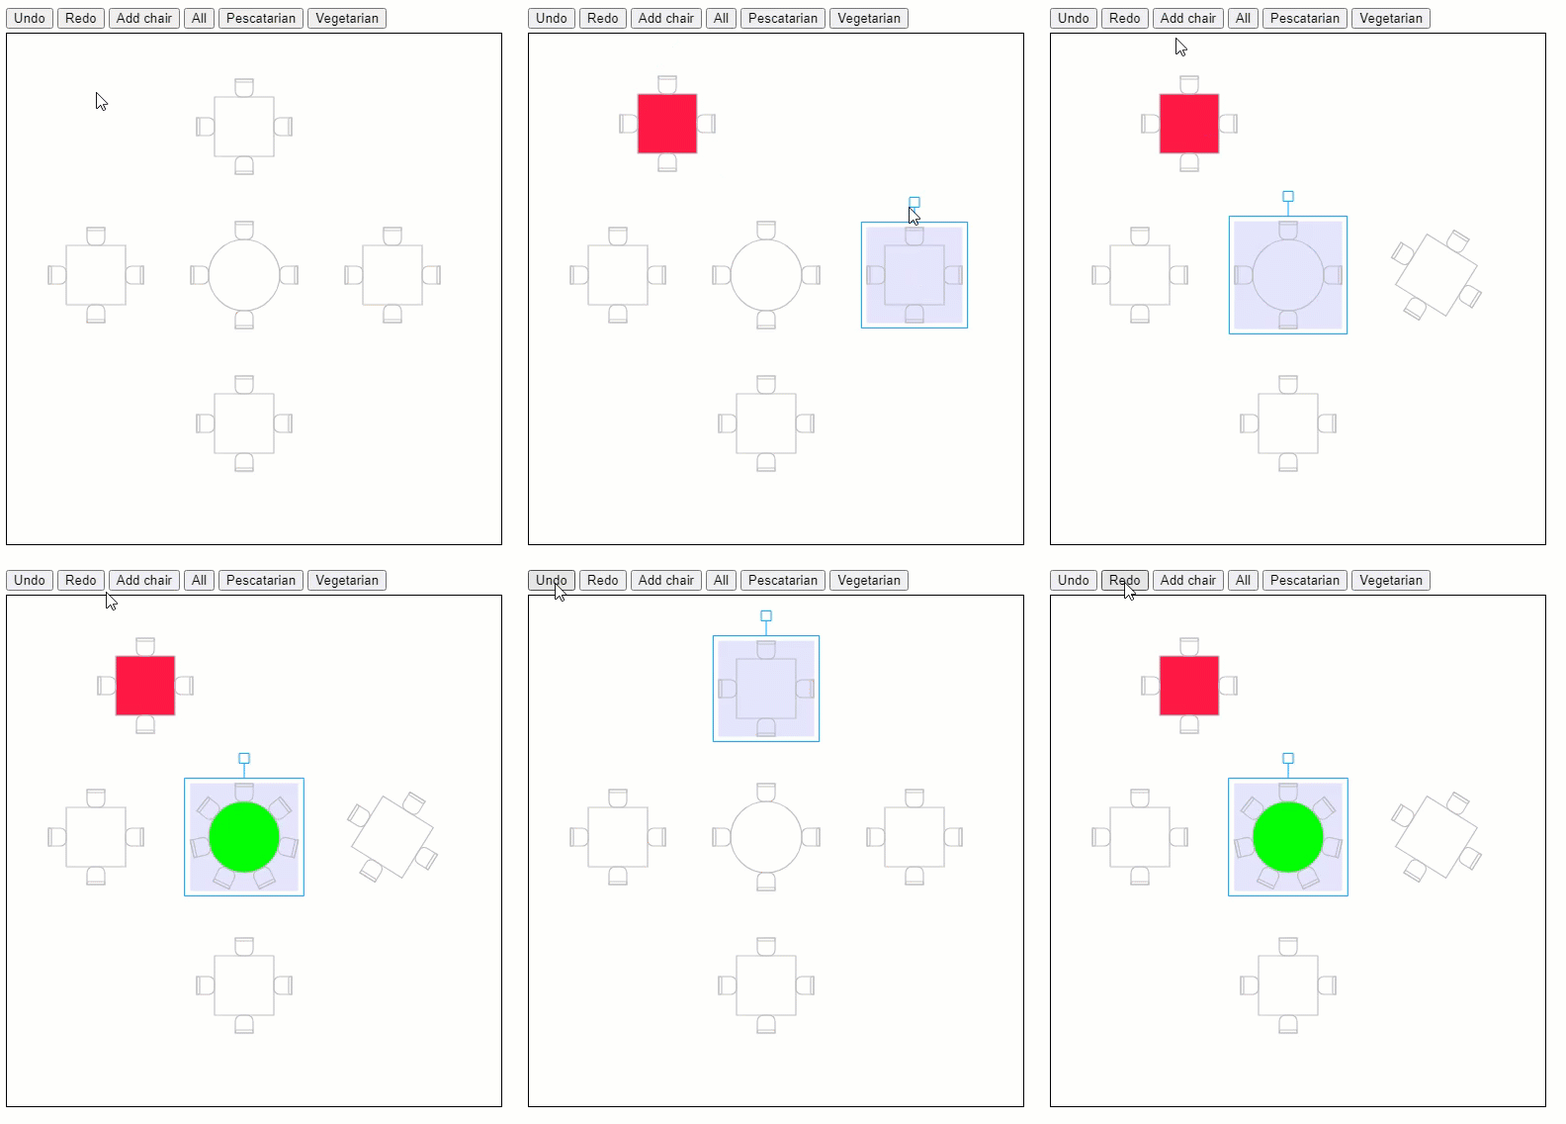
Thinking purely about the objects in the app (not the Konva stuff), we might have an object for a chair and another for four-seat tables, etc. These are the objects that our users are interest in working with. That chair happens to be a Konva Group composed of 2 rectangles, but the users don't see that - they see an aerial view of a chair.
Going beyond the concept of the model to realization in code, I'll have a JS class for each type of object in the model - meaning one for Table and one for Chair.
Each of those objects will encapsulate the details of how to draw itself in a Konva sense.
For example, the Table and Chair classes will each have code defining how to draw itself, and the Table classes will have additional information indicating where its related chairs should be positioned.
I'll want the app to allow the tables to be selected, moved (drag & drop), rotated (transformer), and color-coded to indicate whether they are reserved for vegetarian, pescatarian or omnivore guests. This last bit is slightly contrived because I needed some obvious visual feature to manipulate! The tables must not be overlapped on the plan. And the user can add chairs to a circular table but not a rectangular one.
Id like to mention identities
I've included this section because it's a concept that you need in every project to relate the model to the UI. It's not something that surfaces in your mind in the early stages of throwing Konva shapes out onto the stage, but when you accept the concept of needing a model you inevitably need a way to relate an object in the model to its UI components.
So far we've identified objects in the model, and that there will be code for each type or 'class' of those objects, and that the class code will contain instructions to do the drawing of Konva shapes. There's an important point to tackle about how we relate the shapes we draw back to the objects that they represent from the model.
Why? Excellent question, glad you asked. The data in a model should be kept up to date with any visual changes in the app UI. The user will interact with the Konva shapes that represent the table & chair objects of the model. We need to be able to feed back the results of the dragging, rotating and color-coding into the associated table object in the model.
There might also be functions in the app that feed the other way from model to shapes - maybe an automatic best-fit layout algorithm fired from a UI button. Or the user might be able to change the table shape from circular to square - something that would be applied to the model, but how would be update the relevant parts of the UI?
The 'how' of this from the Konva side is via event listeners. Using these we can detect when the user moves or transforms a shape - but the issue isn't about that , it's how to relate what's happening to a shape back into the model.
We 'could' make an association between these objects by simply setting a variable in each to point to the other. But linking objects like that can give the garbage collector a hard time and de-optimize the use or memory and performance.
A better solution is to make a unique ID for the object in the model and associate that with its Konva shape, which in our restaurant planning app is a Konva.Group. Konva can't help with ID creation, but it can help with its storage. So we need a function to make unique ID's.
Making unique ID's
One approach to making ID's would be to have a simple shape counter variable that we increment each time we add a shape to the stage. That would work up to a point, but what happens when we want to persist and reload our model data. Imagine a case where we added 2 tables and deleted the first. The id of the remaining table is 2 but if we re-load that how can we safely continue the approach?
To solve that we could reset the ID's when we reload persisted data, but then if we have a relationship that relies on using the ID's - maybe a chair knows the ID of its parent table - and we reset them on reload then that introduces another potential problem and complexity.
If simple counters are not going to work we need something else - something not susceptible to sequence or reload issues. In other words a true unique id.
We have those in the form of GUID's, and if the browser implements the cryptoAPI then we have an easy answer. But where the browser might not support it we need a fallback. I use a pseudo UUID generator that makes something that resembles a GUID but relies on Math.random() to do so. Readers might point out that relying on Math.random() can be an issue since two users could generate the same UID's if their Math.random() function spits out the same value, which has a real chance of happening. From my perspective I'm going to forge ahead and use this approach for this demo - if I was going into production I would add a session component to reduce the chances of a clash. The takeaway from this is you need to think hard about the internals of your UID generator and find one that works for your use-case if the cryptoAPI is not available. Here's the code I'm using.
Note: A static method is one we can call without having to instantiate an object from the class.
class Utils {

  static getUUID () {
    try {
      // try the crypto API - note this requires that the page is served via HTTPS.
      return self.crypto.randomUUID()
    }
    catch (err){
      // Apparaently there is an issue with crypto so use the pseudo approach.
      return Utils.PseudoGuid()
    }
  }

  static PseudoGuid (){ // Make a GUID to use in unique id assignment
    const fC = Utils.getSegment;
    return (fC() + fC() + "-" + fC() + "-" + fC() + "-" + fC() + "-" + fC() + fC() + fC());
  }

  static getSegment(){
    return (((1 + Math.random()) * 0x10000)|0).toString(16).substring(1).toUpperCase();
  }

}
We can use this to make and assign a unique ID to each table and store the same key on the Konva table group. We make the table object, create it's Konva.Group and use the Konva setAttr() method to store the ID value inside the Konva shape's data store. The Konva shape uses attrs to hold the information it needs for its own purposes such as fill color, strokeWidth, etc. In a similar way to stashing data on an html element, we can use it too but be careful of not using an attr name that Konva relies on!
At the same time we also store the table objects in the model via a JS Map which is a store for key-value pairs. We can then retrieve the ID from the target of a click event on the Konva shape, and look up the associated table in the model using the id as the key, or use the ID form the table in the model to pass into Konvas stage.find() method and get the Konva shape representing the table.
In other words we've covered the issue of relating the object in the model to the Konva shape.
So - taking all this back to our code we can see that as we create a new Table we invoke Utils.getUUID() to make an ID that we store in the tableId attribute of the table.KonvaShape. That happens to be a Konva.Group in the demo but could be any Konva shape in your app.
Now when the user clicks on the group we can catch that in an event listener, pull the clicked shape from the event data, grab the clicked shapes tableId attribute and look up the related table in the data model via that value. Hurrah!
Walking through the code
Open the CodePen in another window or tab so you can flip between this commentary and the code.
First we have a a JSON object defining a sample plan. As this demo is all in one file, we actually load that sample plan in the very last line of code in the demo.
Then we have JSON objects containing config data for chairs and tables. This allows us to manipulate the size and layout of their visualizations without having to hard code the data throughout the code. This is specific to the sample app and not part of the learning I am trying to impart. The drawing functions then consume this to draw on the stage whichever type of table has been selected. The config data dictates the size of the table and the number of chairs with their position and rotation angle.
The next item which is the Utils class which we know from the above discussion holds the code to make a unique ID, and also handles the isObject() check that we use in the object merge process and the hasOverlap() check to detect table overlap.
Next comes the UndoStack which is going to manage the undo/redo process for us. More about that later.
Then we set up the stage, layer and transformer. The stage is scaled so that we can see the initial set of tables - see this other blog article for a technique for fitting the content to the view. The transformer will be used as a focus indicator - every time the user clicks or drags a table the transformer will be applied to that table. The transformer is configured to disallow scaling/resizing of the tables, but dragging and rotation are allowed.
After that we can see a simple 'model' object variable being declared. In this simple app the model contains only JS Maps that will contain the list of tables and chairs in the current plan. Any real-world app would have a more complex model and relationships between objects, but the focus here is on the approach and undo-redo mechanism and I am keeping the model uber simple to avoid distractions.
Typical object code layout
Then we come to the definition of the Chair class. This is a typical class layout for the way that I code and think. Note that I am ignoring the niceties of classes such as getters & setters and private properties, etc, but I use those too in anything outside a demo.
The constructor receives the arguments that it needs to create the class. In the case of the Chair this means the position of the chair, the angle to which it should be rotated, the parent table's Konva.Group and id.
The Chair's draw() method consists of 2 parts - I've separated them to be clear -
- drawFirstTime() executes when the chair is first drawn, and includes all the creation and settings of the Konva shapes needed to represent the chair in the UI.
- drawEveryTime(), runs every time that the draw() method is called, and applies any current values from the model to the Konva shapes that represent the chair in the UI. In the case of the Chair this means the position, rotation angle and visibility.
Note that in the case of the Chair, the last act of the constructor is to call draw(). This is not always possible - often more data is required that is not initially available when the constructor executes.
The Table class
This is where the good stuff comes in. The class code follows the same footprint as the Chair in that there are some public properties, a constructor and the draw() methods. The draw() method takes the same approach as per Chair, with a fork that runs first-time through creating the Konva shapes and some run-every-time code applying any visual parameters dictated by the table object in the model.
There are no other Konva instructions for the Table - only those in the draw() methods. To change the appearance of a Table instance we modify the attributes of the associated table object in the model then call it's draw() method. If we have to modify the app we know where to come to make changes to the Konva shapes and our only decision is whether they should be applied first-time or every-time.
Important point: Try to keep the Konva code in one place. Update the model and have the Konva shapes respond to those changes - don't sprinkle Konva code all over your code base - The Author
This approach ring-fences the Konva code within the class which keep the code tidy and, as I mentioned at the start of the article, Konva is now slipping into the background and allowing us to concentrate on how the app should function overall.
The Table constructor receives arguments giving the table shape name and position. The shape name is used to lookup the config data in the tableData. This gives the necessary dimension information and chair config.
The chairs are loaded in a loop via the addChair() method. A Chair object is created and positioned via the Chair class for each chair defined in the tableData, and finally the Konva.Group containing the shapes that make up the new chair is added as a child of the Konva.Group that represents the table. Note that since we have an 'Add chair' button in the UI, the addChair() method can be called outside of the first draw process - hence why it exists as a separate method.
Note: For positioning of the tables and chairs in this code I use their center point. What I mean is that by default, Konva shapes are positioned / drawn from top-left (for rectangle shapes) or the center point (for circle-based shapes). In this app the use-case allows, and the code is simplified by, drawing the shapes from their center point. Therefore, when the tableData says that a shape is rectangular, the code to draw the rectangle includes instructions to position the rectangle so that the center of the table is located at the (x, y) position given in the constructor arguments. Not all app use-cases allow this and I'm not proposing it as a recommended approach - you do what your app requires!
Setting up event listeners
The user can interact with a table - it can be selected, dragged or rotated. We therefore require some event listeners to handle these actions. The 'mousedown', 'dragend' and 'transformend' event listeners handle the activities required when those events occur.
Note: In this demo I have added those listeners on the shapes themselves, but in your own app if you have a large quantity of shapes then you might need to consider delegating the event listeners to the layer or stage for reasons of memory efficiency. - see this tutorial for an example of the approach.
Groups don't have direct click - eventRect
This is a side-note about the onClick listener. There is a trap here because we use a Konva.Group as the UI representation of the table, but the Konva.Group itself is not directly clickable - the Group has an onClick listener but only a click on the Konva.Group's listening child shapes can trigger it. And worse, a click on the 'empty space' around the child shapes will not invoke the click event.
So we add to the Group a transparent rectangle set to be the same size as the Group - see the eventRect variable. This rectangle has the listening parameter set true whilst any other shapes that compose the Table group have listening set to false. When the eventRect is clicked it will fire the parent Group's onClick listener, giving the user a natural UI interaction with a group.
Back to the subject of undo - redo
Ok - we've been going for a while now and whilst it might have been useful stuff, its time to get back to the primary subject of undo-redo. Let's list the ations that the user can carry out:
- drag - they user can drag a table to position it in the room
- rotate - a table can be rotated
- change the table type to vegetarian / pescatarian / omnivore, which visually changes the color
- add chairs to circular tables
Just before we get into the detail I want to introduce the change object. This consists of an object type & id, then 'before' and 'after' sections containing the attributes that are modified by the change.
      const changeData = {
        obj: {
          type: 'table',
          id: <some id>
        },
        before: {
          <attr values before change>
        },
        after: {
          <attr values after change>
        }
      }
The object type is needed because in the demo app we will have some changes that affect tables and some that affect chairs. Therefore when we come to undo or redo a change we need to know how identify the object being changed - are we changing a chair or a table?
The before attributes are required so that we can apply an undo action, which simply re-applies the attributes the were recorded before the change was made. Meanwhile the after attributes are required so that we can re-do the change if it has been undone.
You might ask why we don't just use the current object values as the 'after' version. The answer is because we can back-up through multiple changes via applying undo's, then we might need to go forward again via redo's, but without the after attributes the state of the object would be lost across the undo step, making the redos impossible.
You might also wonder what how we actually get the Konva shapes to change. Hold that thought and lets look at how we handle this for drag & drop.
Undo - redo for drag
Dragging changes the (x, y) position of the shape. In terms of events there are three phases - dragstart, dragmove, dragend - and we're interested in only the dragend which fires when the user drops the shape.
As we have seen above, our change structure includes both the 'before' AND 'after' change information for the property that is changed. The table in the model has the 'before' position attribute and this will be unchanged by the drag of the Konva shape - the drag impacts the Konva shapes only and it is up to us to write code to apply the change detected by Konva to the model.
But our app requires that we show a focus indicator on the current table, so in the dragstart we set the visual focus on the table that is being dragged. This is done by setting the table object's focus property and asking it to draw itself again. In the draw method that value of focus causes the Konva transformer to be put on the table shape which gives the visual appearance of the shape being active / selected.
So, the user then drops the table wherever it needs to go. At that instant the information that we need for our change log is available in the shape's position. We set up the change object as below:
      const changeData = {
        obj: {
          type: 'table',
          id: table.id
        },
        before: {
          position: {
            x: table.position.x,
            y: table.position.y
          }
        },
        after: {
          position: {
            x: table.konvaShape.position().x,
            y: table.konvaShape.position().y
          }
        }
      }
Cool - but err, we didn't actually store that data anywhere so how is it useful? Good question - the next line calls the apply method of the undoStack.
undoStack.apply(change)What that does is to tuck away the change object in the next slot of the undo stack, and call the applyRedo method which is a convenience to get the change applied to the model table without having to repeat the code. We can do this because the apply-change process is identical to the redo process once the change is stored. More on redo very shortly.
  apply(change){

    // set the max stack pointer for the new entry
    this.max = this.idx + 1

    this.undoStack[this.max] = change;

    this.applyRedo()

  }
It might be dawning on you now that the undo stack is a very simple structure containing an array into which we put the change objects that we make to reflect changes that we need to track. It's slightly more involved than that, in terms of knowing where in the stack to insert a change, and we can't just use the JS Array.push() feature to continually add to the stack.
For example, if the user carries out 6 changes then hits undo 3 times, we recorded 6 changes to the stack but the user backed up 3 positions, which means that if they make another change we need to insert that change at position 4, overwriting the previous change that was there, and we can't use 5 & 6 as they no longer relate to the current change history.
Simply using push & pop will not work here, and instead we need a current slot pointer and a max slot pointer as you can see in the code. The current pointer gives us the current change, and the max gives the current top position of the stack.
So we stored the change - what about actually applying it? Obviously in the case of the drag process this is a bit of a moot point because the user already moved the shape! But think about what is happening under the covers here - the user moved the Konva shape but we have not yet informed the model that the table object moved. So we need to apply the change to the model.
And finally, we arrive at the reason for this blog even being written. Someone on the Discord channel asked how to set up do-undo without having a huge switch statement set up to catch each possible change that an object might need to record.
Because of all the work that we did to set this up, applying the change is a matter of merging the changed attributes that we stored in the change object into the target object in the model.
I'll say that again - all we need to do is merge the attributes of the change object into the target table object and ask it to draw itself again. If we are 'undoing' a change its the 'before' version of the change, and if we are 'redoing' the change then we use the 'after' version that we apply.
So how do we merge object attributes? See the UndoStack.mergeAttributes() method in the code. What this does is walk the attributes of the change object and apply them to the same-name attribute of the target object. If the attribute happens to be a JS object, such as is the case for the table.position, then another nested call to mergeAttributes() ensures that the necessary 'deep' merge can be done.
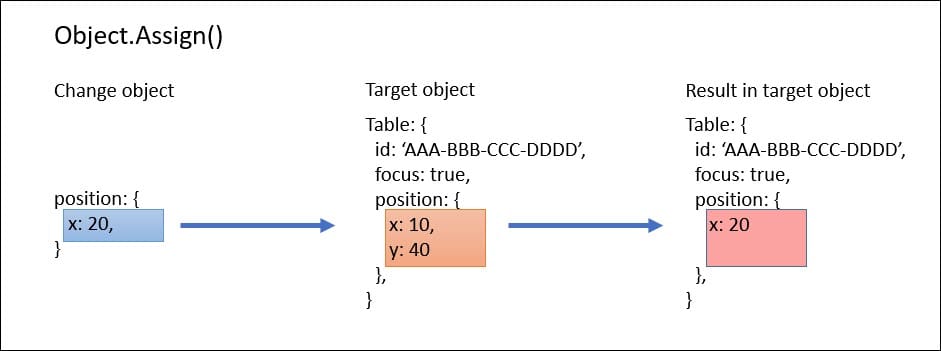
Note: Readers may be away of the built-in JS Object.assign() feature and wonder why this is not used. The answer is that it cannot do a deep merge, and that has the annoying effect that child objects are entirely replaced rather than selected attributes being merged in. Take a look at the image below showing how Object.Assign() replaces the position object rather than merging, whilst the mergeAttributes() method achieves what we need an merges the attributes.
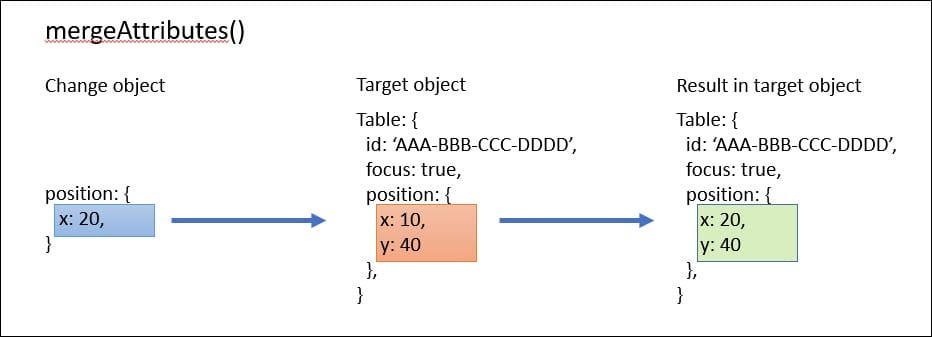
This means that we only have to store the attributes that are altered by the change - we don't have to snapshot the entire object state / all of its attributes.
Why not write a funky delta generator?
The idea here is to make standardized code that can detect when changes happen and automatically create a change object that describes the change. Then the per-change specifics are somehow isolated and the whole thing is simplified.
The practicalities would be to write code to traverse the object being changed to detect the changes and in that way generate the change details. If we think about that, it would require that we clone the target object, then apply the change, then compare them to get the delta, then store the delta. That's quite a lot of complexity. My perspective is that when a change is being made we know which property or properties are changing - so why not skip the delta creation and just note down what we know - its the same result with less complexity.
My current view is that I don't see that approach as a gain in either capability , simplicity, extensibility or robustness. I'll keep an open mind but stick to my approach for now.
A case where this approach fails?
This technique can be used as-is for simple string, number or boolean attributes and nested plain JS objects. Where it might get more complicated is the case of adding or changing a hierarchy of objects and certainly merging arrays would need more code.
What about the 'Add chair' button - how does undo-redo work with that?
How it is accomplished is that when we add a chair to the table we create a new Chair object and associate it to the table. Only circular tables are allowed to have chairs added in this way, and the drawEveryTime() process handles telling the chairs where to draw themselves. So that handles the adding of a chair, but how do we manage the change for undo-redo?
What we do is employ a 'visible' attribute on the chair. We only calculate chair position for visible chairs, and we only draw visible chairs. If we had code in the demo to save the plan we would only save the info about visible chairs.
In this way, our change object needs only to manipulate the chair.visible attribute.
      const changeData = {
        obj: {
          type: 'chair',
          id: 'CCC-DDD-EEE-FFF'
        },
        before: {
          visible: false
        },
        after: {
          visible: true
        }
      }
If we undo the addition of the chair, the chair.visible attribute is set to 'false' and when we request the table to draw itself the chair is disregarded because it is not visible. If we redo the change then the chair object already exists so no create process is needed - we simply flip the visible attribute to true and the chair is drawn as expected.
Yes - there is an overhead of having the additional chair in existence if we decide to 'undo' its creation. But its a small overhead compared to the simplicity of the overall approach.
OK - what about something else?
If there ever IS a super-special requirement to handle something that does not fit the overall approach then this could be handle by slipping in a change type into the change object and using a switch statement inside the mergeAttributes() method to catch those special cases when they were needed. The change object with its before and after information should still work, since all we are doing to make a change is altering data.
If you do find yourself thinking you have a change that is too complex for this approach, step back and see if it can be simplified. In the demo the changes I illustrate are all single-attribute changes(yes I know position is 2 attrs, but you get what I mean), but there is no reason why multiple attrs of the same object can't be stored in one change object.
For example, if we had to make changes to multiple objects as a single unit, I would add a changes array to the change object, with each entry being an individual change with a target object identifier and before & after data. Detecting the presence of the changes array would trigger a loop-driven process that iterated the changes and applied each in turn. Some thing like this which shows two tables being modified in one change.
      const changeData = {
        changes: [
        {
          obj: {
            type: 'table',
            id: 'AAA-BBB-CCC-DDD'
          },
          before: {
            visible: true
          },
          after: {
            visible: false
          }
        },
        {
          obj: {
            type: 'table',
            id: 'AAA-BBB-CCC-EEE'
          },
          before: {
            diet: 'Vegetarian'
          },
          after: {
            visible: 'Pescatarian'
          }
        }
       ]
      }
Summary
Congratulations and thanks on reading this far. We've seen something of how I lay out my Konva apps in plain JavaScript, some solutions to common development challenges, and specifically a light-touch way to approach undo-redo.
Let me know how you get on!
Thanks for reading.
VW. July 2023
Photo by Mick Haupt on Unsplash