You can get the pixels color values from any part of your canvas. What you get is an array that doesn't have any obvious correlation to the width and height of the area you requested. What gives and how can you iterate through what you got?
TLDR: See the demo here at CodePen, then come back and read about what's going on. The video below gives a flavour of what's going on - on the left we have the source canvas and on the right a simulation of how we walk in from the edges to find the first colored pixel
The structure you get back from the getImageData() call is a Uint8ClampedArray Click that link to read more about it at MDN. Long story short, its a single-dimensional array. As to the length of the array - each pixel in your canvas has 4 color values, these being the Red, Green, Blue and Alpha of RGBA. So for every pixel on the screen the array contains a slot for the red, blue, green and alpha transparency components. The range of values for each are o - 255. So for r, g and b a zero value means no color of that type is used, and for the alpha value zero means fully transparent.
If you need to check for visible color pixels, just check that the alpha value is > 0.
So how to iterate over this data
Ok so for a 100 x 50 image we get an array that is 100 x 50 x 4 in length.
If you want to convert an (x, y) position on the image to the red of the target pixel you can use
y * (width * 4) + x * 4because each row is (width * 4) in length. To go to row 6, for example, you need to go to (6 x image width) but you need to include the 4 factor because each pixel in the row has 4 values in the array.
And to go to the 12th pixel on any row, you need to add (12 * 4), again because each pixel takes up 4 slots in the array.
In the MDN article they give this handy sample code to get the color values at any (x, y) position.
const xCoord = 50;
const yCoord = 100;
const canvasWidth = 1024;

const getColorIndicesForCoord = (x, y, width) => {
  const red = y * (width * 4) + x * 4;
  return [red, red + 1, red + 2, red + 3];
};

const colorIndices = getColorIndicesForCoord(xCoord, yCoord, canvasWidth);
Putting this to use
Lets look at something useful to do with this data. One of the things you might need to do at some point is to find the minimal rect that surrounds the content of an image, where the image has transparency around the edges. Think of a passport photo - you have the subjects face central in the image but space around it.
Calling Konva's getClientRect on that image would give you a rect of (x, y, width, height) that included the transparent area. To get the minimal rect without the transparent area, we need to inspect the pixels of the image. More accurately we need to find the first pixel with any color value, walking in from each edge.
Look at the image below which we will use as the example.
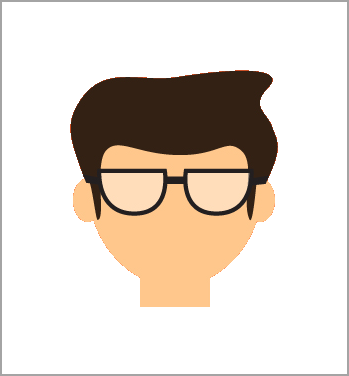
Getting the minimal rect for an image with transparency
So, we have an image and it has some transparency around the subject. How can we get the minimal rect that surrounds the subject?
One approach is to step in from each edge in turn and find the first line with a colored pixel. For example, starting at the top we would look at row 1, scanning its pixels from left to right until we find any pixel with some color value. The first we find gives us the upward extent of the image. I've tried to show the direction of the scan for each edge via the arrows shown below.
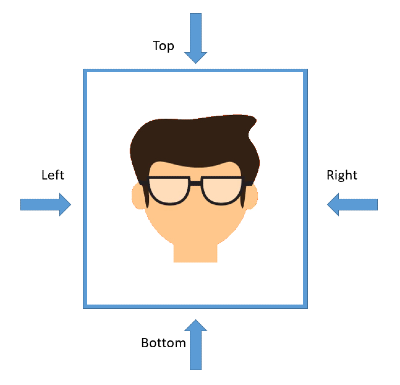
Repeat that moving up from the bottom to find the lowest extent. Then do the same from left and right. We will then have the 4 values that define the top, bottom, left and right-most extents of the image.
Lets look at the stages that are needed to achieve that.
Basic steps
The basic steps we need to master are:
- getting the image data for the specific area of the source canvas ;
- processing the image data array to find the edge-most pixels.
#1 Get the source image data
We could do all this in Konva but we can do it faster if we work with native canvas instances. We can snapshot any area of one canvas into another using the canvas drawImage method.
Given a source canvas, a source rect (x, t, width, height) and a target rect on a target canvas, we can draw whatever is on the source directly into the target without the need for any intermediate steps. This is good because copying images can be costly if not done right. Here's the function that does it.
/*
* Function to draw the contents of the source rect of the given canvas into the target rect of an offscreen canvas and return the image data array.
*/
function getByCanvas(sourceCanvas, sourceRect, targetRect){

const
      offscreen = new OffscreenCanvas(targetRect.width, targetRect.height),
      offscreenCtx = offscreen.getContext("2d");

  // draw the source canvas into the target canvas
  offscreenCtx.drawImage(sourceCanvas, sourceRect.x, sourceRect.y,
      sourceRect.width, sourceRect.height, targetRect.x, targetRect.y,
      targetRect.width, targetRect.height);

  // get the image data
  return offscreenCtx.getImageData(
    targetRect.x,
    targetRect.y,
    targetRect.width,
    targetRect.height
  );
}
Note also that this uses an offscreen canvas, and this function could be used with a web worker. The offscreen canvas does not have the DOM wiring and overhead so this is about as high performance as you can get.
The last part of the function returns the image data array from the offscreen canvas.
I'll explain why we need the target rect when we mention performance further down this post.
#2 processing the image data array to find the edge-most pixels.
Once we have the image data array life is at once simple and complex. Simple because the image data is an array, but complex because we want to to work in from the edges which the one-dimensional layout of the image data array does not make easy.
Without meeting our needs for processing from the edges, a simple walk of the image data would look like this.
// assumes data contains the image data and width & height are size of image
for (let y = 0; y < height; y++) {
  for (let x = 0; x < width; x++) {
    const alpha = data[y * (rect.width * 4) + x * 4 + 3]
    if (alpha > 0){
      console.log('Hit at ' + x + ', ' + y)
  }
}
The concept here is that we walk the rows from top to bottom, inspecting each pixel from the left to the right. We get the alpha value for each pixel and if the values is grater than zero, indicating that some color is present, we announce a hit.
However, for our current case we need to modify the approach so that we can walk inwards from each edge. To accomplish this, rather than use 4 different loops, I use one loop construct with differing inputs, as shown in the following function.
function getBox(rect, data) {

  // We will run the same walking process from each edge.
  // Since we flip the axes we use A and B variables to avoid fixating on x & y.
  let startA = 0,
    endA = 0,
    stepA = 0,
    startB = 0,
    endB = 0,
    stepB = 0;


  const
    edges = ["left", "top", "right", "bottom"],
    pos = { x: 0, y: 0, width: 0, height: 0 };

  // Process for each edge
  for (const edge of edges) {
    let found = false;

    switch (edge) {

      case "left":
        startA = 0;
        endA = rect.width - 1;
        stepA = 1;
        startB = 0;
        endB = rect.height - 1;
        stepB = 1;
        break;

      case "right":
        startA = rect.width - 1;
        endA = 0;
        stepA = -1;
        startB = 0;
        endB = rect.height - 1;
        stepB = 1;
        break;

      case "top":
        startB = 0;
        endB = rect.width - 1;
        stepB = 1;
        startA = 0;
        endA = rect.height - 1;
        stepA = 1;
        break;

      case "bottom":
        startB = 0;
        endB = rect.width - 1;
        stepB = 1;
        startA = rect.height - 1;
        endA = 0;
        stepA = -1;
        break;
    }

    for (let a = startA; a !== endA; a = a + stepA) {
      for (let b = startB; b !== endB; b = b + stepB) {

        // relate the a & b to x & y.
        x = edge === "left" || edge === "right" ? a : b;
        y = edge === "left" || edge === "right" ? b : a;

        // Check the alpha value - any value > 0 and we have a hit!
        if (data[y * (rect.width * 4) + x * 4 + 3] > 0) {
          found = true;

          switch (edge) {
            case "left":
              pos.x = x;
              break;
            case "top":
              pos.y = y;
              break;
            case "right":
              pos.width = x - pos.x;
              break;
            case "bottom":
              pos.height = y - pos.y;
              break;
          }
          break;
        }
      }
      if (found) {
        break;
      }
    }
  }

  return pos;
}
The result returned from this function is a rect (x, y, width, height) object defining a box which encloses the colored content.
Thinking about performance
What about that target rect I mentioned? Ok - so we could get the image bits of the full-sized image from the source canvas. That approach work fine and it is the most accurate because it inspects every pixel.
However, two aspects of the approach are costly for performance. Firstly, getting the image bits requires allocation of memory then copying the values into the array. This is a native ability of the underlying HTML5 canvas and so should be optimised as best it can be, but there is still a cost. Secondly, and more importantly, walking through the image data array data has a cost and whatever code we write to be executed per step in that process will more.
But we can think about how to reduce the hit we take on the second point. A tactic would be to ensure that we grab and process the smallest amount of image data that we can. For example, if we can reduce the size of the image we have to process by a factor of 2 then we have 25% of the original array length to process - that's a huge 4 x less. Go to 3 and it's one nineth, to 4 and it is one sixteenth.
And the good news is that we can make that reduction efficiently because the native browser canvas can do that grab and resize for us in one step.
And this is what leads us to need a target rect on the getByCanvas() function. Before the function is called the target rect is calculated by reducing the source rect by the factor found in the factor select bow - 2 by default.
Padding it out
You will notice in the demo code that I add some padding to the final rect - why? We had to discuss the target rect / reduction of image tactic above before this would make sense.
When we make a reduction of the image size, the compression process will ultimately lose pixels and hence we will get some inaccuracy creeping in. Its unavoidable.
Using a small size reduction as we snapshot the main canvas is not an issue. For example going down by a factor of 2 does not lose pixel color in any drastic way. However, large reduction factors do start to introduce inaccuracy.
To avoid this affect we can add back some padding into the rect we return from the measurement process. In practical terms, as little as 5 or 10 pixels is all that is required.
How could we improve accuracy whilst maintaining performance?
Truthfully, if we needed to be scientifically accurate and could not use the arbitrary padding solution, then we probably cannot achieve best performance because whatever we do will require more processing - either using no reduction factor for the target image, or post-processing the source image.
The most simple, totally accurate approach is to use no second canvas and just grab the image data off the main canvas. You are processing the worst-case amount of data, but this is the most accurate one-step process.
If we are dealing with large images, then we can use the reduction factor approach to get an approximation for the bounding box and we could use the edges of the bounding rect as hints to process the original image data.
For example, say we have a left edge value of 25, meaning that the reduced image approach gave the first non-transparent pixel on the original image at x = 25. We can then process the image data of the original image and work outwards from this x position seeking the first full column with no colored pixels. We might find the first clear column at x = 23 - which gives us an accurate position without having to process the entire image data array. Repeat for each edge.
In my own opinion, where best performance is required I recommend the reduced image approach with a factor of 3 reduction and arbitrary padding of 5px.
Summary
We've seen the optimum approach to getting a reduced size array of image data. We know that the approach performs well with the expense of accuracy but that we can solve that with a sprinkle of padding or more costly solutions.
Thanks for reading.
VW Apr 2024